Install Rocky Linux 9.8: UEFI and Initial Security Configuration
EdwardMoon
This Rocky Linux installation guide walks through verifying the Rocky Linux 9.8 ISO, booting with UEFI, and configuring storage, networking, an administrator account, and security defaults. The sequence covers everything from pre-installation backups to the first update and service checks, making it accessible to newcomers.
For production servers, check application compatibility rather than deploying a version merely because it is new. Confirm the current release and end-of-support date in Rocky Linux’s official version table, and reproduce the installation on a VM first.
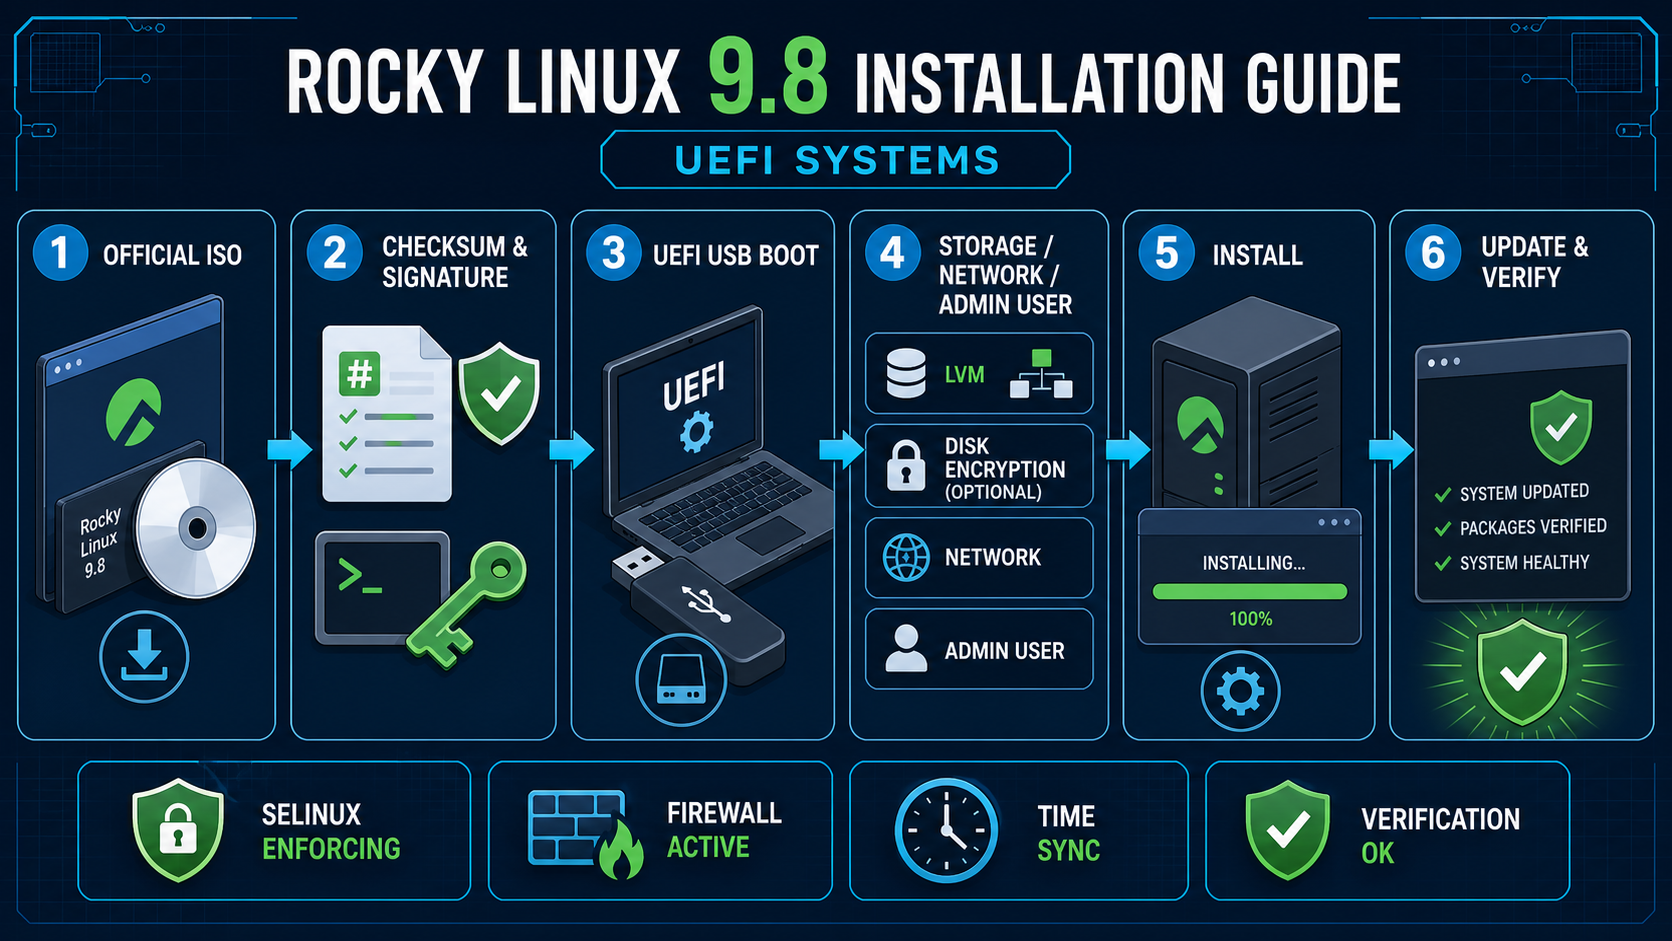
Before Installation
| Item | Recommended baseline | Consideration |
|---|---|---|
| Installation media | Official Rocky Linux 9.8 ISO | Verify checksum and signature |
| Firmware | UEFI, with Secure Boot where possible | Do not mix legacy and UEFI boot modes |
| Disk | Verify backups and identify the target | Avoid initializing the wrong disk |
| Network | Prepare IP, DNS, gateway, and NTP settings | Secure console access for remote servers |
| Accounts | Individual administrator accounts with sudo | Avoid shared root logins |
Step 1: Download the ISO and Checksums
curl --fail --location --remote-name   https://download.rockylinux.org/pub/rocky/9/isos/x86_64/Rocky-9.8-x86_64-minimal.iso
curl --fail --location --remote-name   https://download.rockylinux.org/pub/rocky/9/isos/x86_64/CHECKSUM

sha256sum Rocky-9.8-x86_64-minimal.iso
grep 'Rocky-9.8-x86_64-minimal.iso' CHECKSUM
Download installation media from an official mirror and compare SHA-256 checksums instead of relying on the browser’s download-complete indicator. Where possible, also verify the CHECKSUM signature with Rocky Linux’s official signing key.
Verify the Rocky Signing Key
curl --fail --location --remote-name   https://download.rockylinux.org/pub/rocky/RPM-GPG-KEY-Rocky-9
gpg --show-keys --with-fingerprint RPM-GPG-KEY-Rocky-9

# Import only after manually comparing the fingerprint with the official website
gpg --import RPM-GPG-KEY-Rocky-9
Step 2: Create a Bootable USB
On Windows, use a trusted tool such as Fedora Media Writer or Rufus. On Linux, dd can erase data immediately if the wrong output disk is selected. Verify the model, size, and mount state before proceeding.
lsblk -o NAME,PATH,SIZE,MODEL,TRAN,FSTYPE,MOUNTPOINTS
sudo umount /dev/sdX? 2>/dev/null || true

# Run only after confirming /dev/sdX is the actual whole USB disk
sudo dd if=Rocky-9.8-x86_64-minimal.iso of=/dev/sdX   bs=4M status=progress conv=fsync
sync
sudo eject /dev/sdX
/dev/sdX is a placeholder. Do not run dd unless you have positively identified the whole USB disk, rather than a partition. Verify backups of existing data first.
Step 3: Boot with UEFI
- Open the server’s remote console or local display.
- Select UEFI boot mode in firmware.
- Keep Secure Boot enabled where possible.
- Choose the USB device’s UEFI boot entry.
- Select Test this media & Install to check media integrity first.
Changing a legacy BIOS installation to UEFI later can leave the boot partitions and bootloader incompatible. Establish the standard firmware mode at installation time.
Step 4: Language, Time, and Keyboard
Choose the system language based on the administration team’s logging and automation needs. The example uses Asia/Seoul with the hardware clock set to UTC; verify chrony synchronization after installation.
Step 5: Select Storage and Configure LVM
Beginners can start with automatic partitioning and LVM. For servers that accumulate logs, containers, or data under /var, consider separate logical volumes for growth and failure isolation. UEFI systems require an EFI System Partition.
- EFI System Partition: stores boot files
- /boot: stores kernels and initramfs files; leave room for updates
- LVM root: allows capacity expansion during operation
- /var or data volumes: separate according to service needs
- Swap: size according to memory and crash-dump policy
- LUKS encryption: use with a key-recovery procedure where physical disk theft is a concern
Step 6: Network and Hostname
If a static IP is needed, enter the address, prefix, gateway, and DNS, then activate the connection. Align the hostname with forward/reverse DNS and organizational naming rules. Keep console access available for remote servers in case the network configuration is incorrect.
ip -br address
ip route
getent hosts repo.rockylinux.org
hostnamectl status
nmcli connection show --active
Step 7: Administrator Account and Authentication
Create an individual administrator and add it to wheel. Lock root or protect it with a strong separate password. Restrict password-based SSH only after verifying public-key login.
id opsadmin
sudo -l -U opsadmin
getent group wheel

# First verify successful public-key login in a separate session
ssh -o PreferredAuthentications=publickey opsadmin@server.example.com
sudo sshd -t
Step 8: Select Software
Use Minimal Install as the server baseline and add only required packages. Distinguish servers from management workstations that need a GUI, and install development toolchains or debugging packages only for a real use case.
Step 9: Apply the First Update
cat /etc/rocky-release
uname -r
sudo dnf repolist --enabled
sudo dnf upgrade --refresh -y
sudo dnf check
sudo reboot
Reboot after updates to the kernel and core libraries. Afterward, recheck the release, active kernel, and failed units to confirm the update is actually in use.
Step 10: SELinux, Firewall, and Time Synchronization
getenforce
sudo sestatus
sudo firewall-cmd --state
sudo firewall-cmd --list-all
systemctl is-active chronyd
chronyc tracking
timedatectl status
Do not disable SELinux or the entire firewall to troubleshoot. Inspect denial logs and required ports, then correct the narrowest necessary policy or service rule.
Allow Only Required Firewall Services
sudo firewall-cmd --get-active-zones
sudo firewall-cmd --permanent --add-service=https
sudo firewall-cmd --reload
sudo firewall-cmd --list-all
Step 11: Basic SSH Security
sudo install -d -m 0755 /etc/ssh/sshd_config.d
sudo tee /etc/ssh/sshd_config.d/20-hardening.conf >/dev/null <<'CONF'
PermitRootLogin no
PubkeyAuthentication yes
PasswordAuthentication no
KbdInteractiveAuthentication no
MaxAuthTries 4
CONF

sudo sshd -t
sudo sshd -T | grep -E '^(permitrootlogin|passwordauthentication|kbdinteractiveauthentication) '
sudo systemctl reload sshd
Before disabling password login, verify public-key login from another terminal and keep console access available. Follow organizational policy first if centralized authentication or MFA is in use.
Step 12: Validate State and Logs
sudo systemctl --failed --no-pager
sudo journalctl -p err -b --no-pager
sudo ss -lntup
df -hT
df -i
findmnt
sudo dnf check
sudo rpm -Va | sudo tee /root/rpm-verify-baseline.txt >/dev/null
Preserve Installation and Automation Records
Anaconda’s generated Kickstart file may contain account hashes or storage details. Restrict it to administrators, then version-control a sanitized template as the baseline for future installations.
sudo install -d -m 0700 /root/install-baseline
sudo cp -a /root/anaconda-ks.cfg /root/install-baseline/
sudo chmod 0600 /root/install-baseline/anaconda-ks.cfg
sudo rpm -qa --qf '%{NAME}|%{VERSION}-%{RELEASE}|%{ARCH}\n'   | sort | sudo tee /root/install-baseline/packages.txt >/dev/null
sudo find /root/install-baseline -maxdepth 1 -type f -exec sha256sum {} \;
Official Resources and Related Articles
- Rocky Linux versions and support lifecycle
- Official Rocky Linux installation guide
- RHEL 9 standard installation documentation
- Unattended Installation with PXE and Kickstart
- Linux Disk Space and Inode Troubleshooting
Conclusion
A complete installation includes verified official media, UEFI boot, the correct target disk, minimal packages, an individual administrator account, and post-installation security validation. Update packages, reboot into the new kernel, and verify SELinux, the firewall, time synchronization, logs, and actual services.