Deploy NetBox in an Air-Gapped Network: Rocky Linux 8.10 and Podman
EdwardMoon
Deploying NetBox in an air-gapped network involves collecting packages and OCI images on an internet-connected server, verifying their integrity, and importing them into the offline environment. Copying image archives alone often leads to failures involving Podman dependency RPMs, image tags, database initialization, security settings, or automatic startup after reboot.
This guide uses rootful Podman on Rocky Linux 8.10 x86_64. The example versions checked on July 20, 2026 are NetBox container v4.6.5-5.0.2, PostgreSQL 18-alpine, and Valkey 9.1-alpine. Always recheck the official release notes and registry digests before importing a production bundle.
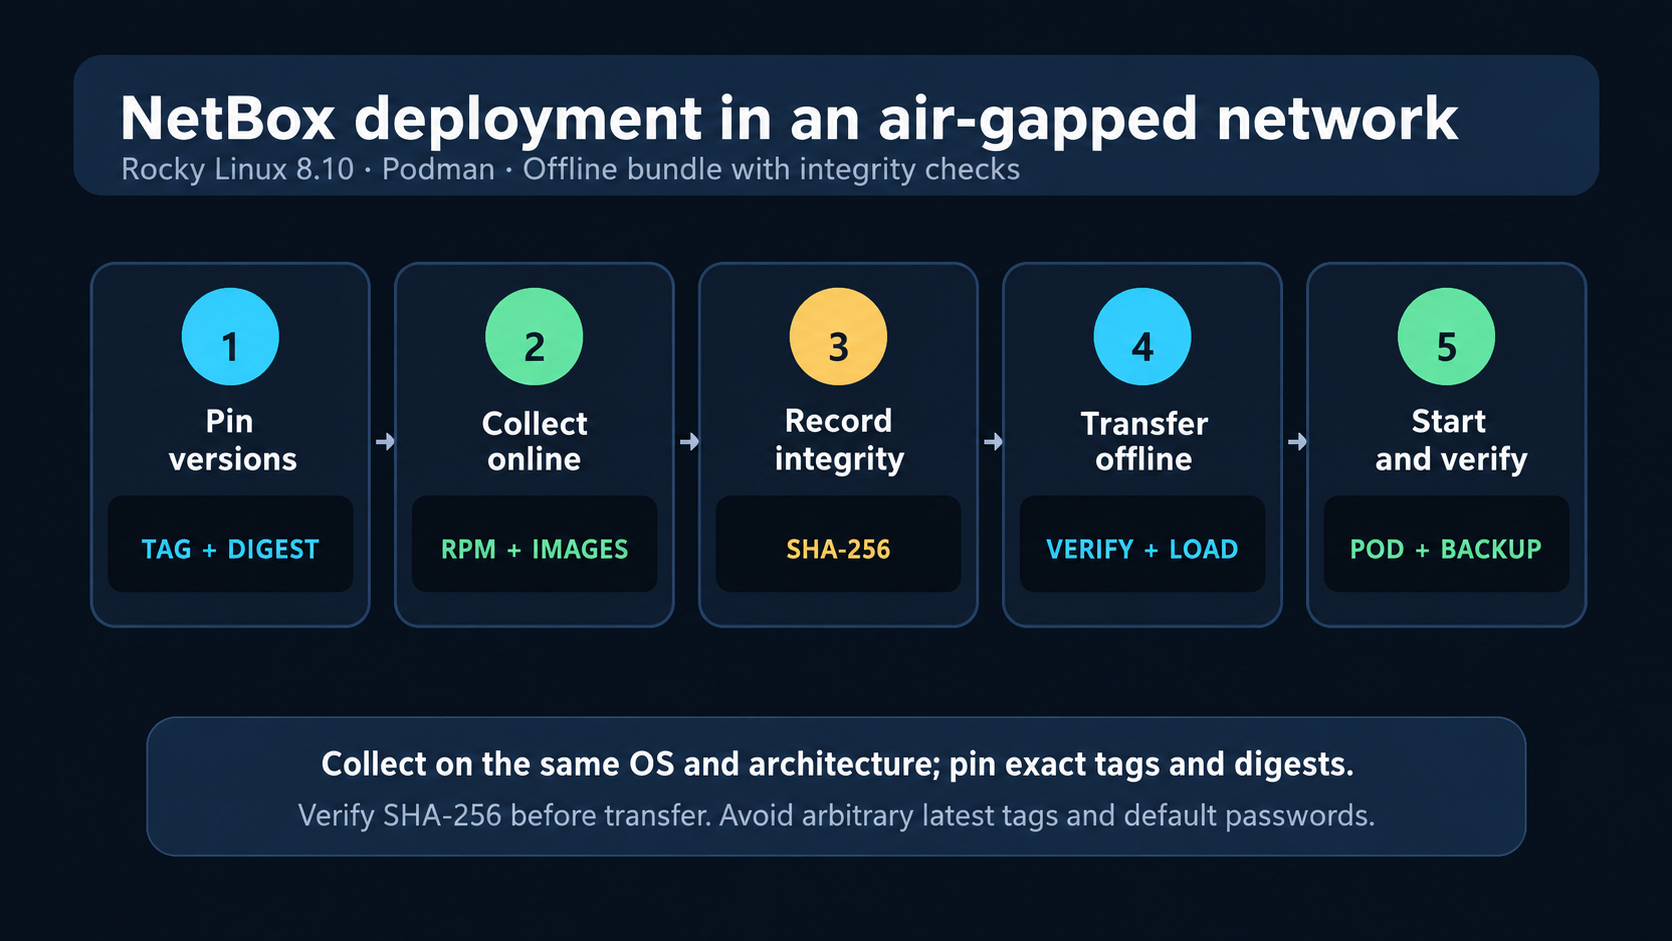
Prerequisites and Validation Criteria
- Match the Rocky Linux minor version, CPU architecture, and enabled repositories on the bundle preparation server and the offline server.
- Use exact container image version tags instead of
latest, and record their digests. - Download RPMs with
--resolve --alldepsto include dependencies already installed on the preparation server. - After preparing the bundle online, reproduce the offline installation on a test server with matching conditions.
- Do not mix rootful and rootless Podman in production. All offline commands in this guide consistently use
sudo podman.
cat /etc/rocky-release
uname -m
sudo dnf repolist --enabled
sudo podman --version| Component | Version pinned in this guide | What to verify |
|---|---|---|
| NetBox Docker | v4.6.5-5.0.2 |
Compatible NetBox and netbox-docker tags |
| PostgreSQL | 18-alpine |
Major-version compatibility with existing data volumes |
| Valkey | 9.1-alpine |
Separate instances for tasks and cache |
| Host | Rocky Linux 8.10 | Matching architecture, repositories, and security policy |
Air-Gapped NetBox Architecture
Place the NetBox web application and worker, PostgreSQL, and separate Valkey instances for tasks and cache in one pod. Containers in the same pod share a network namespace, allowing the application to reach the database and Valkey through 127.0.0.1. Publish only NetBox port 8080 as host port 8000.
netbox-pod
├── netbox             127.0.0.1:8080  ← host:8000
├── netbox-worker      RQ worker
├── netbox-postgres    127.0.0.1:5432
├── netbox-valkey      127.0.0.1:6379  (tasks)
└── netbox-valkey-cache 127.0.0.1:6380 (cache)
If container networking is unfamiliar, start with the site’s hands-on introduction to containers.
Prepare the Offline Bundle on an Online Server
1. Pin Versions and Directory Paths
Set explicit version variables so the same tags can be reproduced after import. Including versions and architecture in filenames also helps distinguish bundles stored together.
NETBOX_TAG="v4.6.5-5.0.2"
POSTGRES_TAG="18-alpine"
VALKEY_TAG="9.1-alpine"
BUNDLE_ID="netbox-airgap-${NETBOX_TAG}-rocky8-$(uname -m)"
BUNDLE_ROOT="/opt/${BUNDLE_ID}"

sudo mkdir -p "${BUNDLE_ROOT}"/{rpms,images,env,scripts,manifests}
sudo chown -R "$(id -u):$(id -g)" "${BUNDLE_ROOT}"
2. Collect Podman RPMs and Dependencies
Using dnf download --resolve alone may skip packages already installed on the preparation server. Include --alldeps for an offline bundle. Different enabled repositories on the preparation and target servers can cause signature or dependency problems, so preserve the repository list in the manifest as well.
sudo dnf install -y dnf-plugins-core

sudo dnf download --resolve --alldeps   --destdir="${BUNDLE_ROOT}/rpms"   podman tar gzip openssl

sudo dnf repolist --enabled > "${BUNDLE_ROOT}/manifests/dnf-repolist.txt"
rpm -Kv "${BUNDLE_ROOT}"/rpms/*.rpm   > "${BUNDLE_ROOT}/manifests/rpm-signatures.txt"
3. Pull and Save Exact Image Tags
NetBox Docker publishes tags combining the NetBox version with the version of its netbox-docker support files. Use exact tags in production and record each digest and image ID immediately after pulling. podman save preserves image layers and tags; it is different from podman export, which flattens a container filesystem.
podman pull "docker.io/netboxcommunity/netbox:${NETBOX_TAG}"
podman pull "docker.io/postgres:${POSTGRES_TAG}"
podman pull "docker.io/valkey/valkey:${VALKEY_TAG}"

{
  podman image inspect --format 'netbox {{.Digest}} {{.Id}}'     "docker.io/netboxcommunity/netbox:${NETBOX_TAG}"
  podman image inspect --format 'postgres {{.Digest}} {{.Id}}'     "docker.io/postgres:${POSTGRES_TAG}"
  podman image inspect --format 'valkey {{.Digest}} {{.Id}}'     "docker.io/valkey/valkey:${VALKEY_TAG}"
} > "${BUNDLE_ROOT}/manifests/image-digests.txt"

podman save --format oci-archive   -o "${BUNDLE_ROOT}/images/netbox.tar"   "docker.io/netboxcommunity/netbox:${NETBOX_TAG}"
podman save --format oci-archive   -o "${BUNDLE_ROOT}/images/postgres.tar"   "docker.io/postgres:${POSTGRES_TAG}"
podman save --format oci-archive   -o "${BUNDLE_ROOT}/images/valkey.tar"   "docker.io/valkey/valkey:${VALKEY_TAG}"
4. Generate Environment Files Without Default Passwords
Never publish or reuse example passwords. These commands generate random secrets during online preparation and restrict environment files to mode 600. Replace the addresses and names in ALLOWED_HOSTS with those used in your offline environment.
umask 077

DB_PASSWORD="$(openssl rand -hex 24)"
VALKEY_PASSWORD="$(openssl rand -hex 24)"
VALKEY_CACHE_PASSWORD="$(openssl rand -hex 24)"
ADMIN_PASSWORD="$(openssl rand -hex 18)"
API_TOKEN_PEPPER_1="$(openssl rand -hex 32)"
SECRET_KEY="$(podman run --rm   "docker.io/netboxcommunity/netbox:${NETBOX_TAG}"   python /opt/netbox/netbox/generate_secret_key.py)"

cat > "${BUNDLE_ROOT}/env/postgres.env" << EOF
POSTGRES_DB=netbox
POSTGRES_USER=netbox
POSTGRES_PASSWORD=${DB_PASSWORD}
EOF

cat > "${BUNDLE_ROOT}/env/valkey.env" << EOF
VALKEY_PASSWORD=${VALKEY_PASSWORD}
EOF

cat > "${BUNDLE_ROOT}/env/valkey-cache.env" << EOF
VALKEY_PASSWORD=${VALKEY_CACHE_PASSWORD}
EOF

cat > "${BUNDLE_ROOT}/env/netbox.env" << EOF
DB_HOST=127.0.0.1
DB_PORT=5432
DB_NAME=netbox
DB_USER=netbox
DB_PASSWORD=${DB_PASSWORD}

REDIS_HOST=127.0.0.1
REDIS_PORT=6379
REDIS_DATABASE=0
REDIS_PASSWORD=${VALKEY_PASSWORD}
REDIS_SSL=false

REDIS_CACHE_HOST=127.0.0.1
REDIS_CACHE_PORT=6380
REDIS_CACHE_DATABASE=1
REDIS_CACHE_PASSWORD=${VALKEY_CACHE_PASSWORD}
REDIS_CACHE_SSL=false

SECRET_KEY=${SECRET_KEY}
API_TOKEN_PEPPER_1=${API_TOKEN_PEPPER_1}
ALLOWED_HOSTS=netbox.internal 10.20.30.40 localhost
TIME_ZONE=Asia/Seoul
LOGIN_REQUIRED=true
ISOLATED_DEPLOYMENT=true
CENSUS_REPORTING_ENABLED=false
COPILOT_ENABLED=false

SKIP_SUPERUSER=false
SUPERUSER_NAME=admin
SUPERUSER_EMAIL=netbox-admin@example.internal
SUPERUSER_PASSWORD=${ADMIN_PASSWORD}
EOF

chmod 600 "${BUNDLE_ROOT}"/env/*
printf 'admin password: %s
' "${ADMIN_PASSWORD}"   > "${BUNDLE_ROOT}/env/initial-admin-password.txt"
chmod 600 "${BUNDLE_ROOT}/env/initial-admin-password.txt"
After the first login, change the administrator password, remove SUPERUSER_PASSWORD from netbox.env, and set SKIP_SUPERUSER=true. The official image uses SUPERUSER_NAME, not SUPERUSER_USERNAME.
5. Create the NetBox Startup Script
Wait for PostgreSQL and both Valkey instances to become ready before starting the NetBox web application and worker. To match the official configuration, run the web application and worker as netbox:root, and skip superuser creation in the worker.
cat > "${BUNDLE_ROOT}/scripts/run-netbox-pod.sh" << 'SCRIPT'
#!/usr/bin/env bash
set -euo pipefail

NETBOX_TAG="v4.6.5-5.0.2"
POSTGRES_TAG="18-alpine"
VALKEY_TAG="9.1-alpine"
BUNDLE_ROOT="/opt/netbox-airgap-${NETBOX_TAG}-rocky8-$(uname -m)"

NETBOX_ENV="${BUNDLE_ROOT}/env/netbox.env"
PG_ENV="${BUNDLE_ROOT}/env/postgres.env"
VALKEY_ENV="${BUNDLE_ROOT}/env/valkey.env"
VALKEY_CACHE_ENV="${BUNDLE_ROOT}/env/valkey-cache.env"

for file in "${NETBOX_ENV}" "${PG_ENV}" "${VALKEY_ENV}" "${VALKEY_CACHE_ENV}"; do
  [[ -r "${file}" ]] || { echo "[ERROR] missing ${file}" >&2; exit 1; }
done

if ! podman pod exists netbox-pod; then
  podman pod create --name netbox-pod -p 8000:8080
fi

for volume in netbox-postgres netbox-valkey-data netbox-valkey-cache-data               netbox-media-files netbox-reports-files netbox-scripts-files; do
  podman volume inspect "${volume}" >/dev/null 2>&1 || podman volume create "${volume}"
done

if ! podman container exists netbox-postgres; then
  podman run -d --name netbox-postgres --pod netbox-pod     --env-file "${PG_ENV}"     -v netbox-postgres:/var/lib/postgresql     "docker.io/postgres:${POSTGRES_TAG}"
fi

if ! podman container exists netbox-valkey; then
  podman run -d --name netbox-valkey --pod netbox-pod     --env-file "${VALKEY_ENV}"     -v netbox-valkey-data:/data     "docker.io/valkey/valkey:${VALKEY_TAG}"     sh -c 'valkey-server --appendonly yes --port 6379 --requirepass "$VALKEY_PASSWORD"'
fi

if ! podman container exists netbox-valkey-cache; then
  podman run -d --name netbox-valkey-cache --pod netbox-pod     --env-file "${VALKEY_CACHE_ENV}"     -v netbox-valkey-cache-data:/data     "docker.io/valkey/valkey:${VALKEY_TAG}"     sh -c 'valkey-server --port 6380 --requirepass "$VALKEY_PASSWORD"'
fi

dependencies_ready=0
for attempt in $(seq 1 90); do
  if podman exec netbox-postgres sh -c        'pg_isready -q -t 2 -d "$POSTGRES_DB" -U "$POSTGRES_USER"'     && podman exec netbox-valkey sh -c        'valkey-cli --pass "$VALKEY_PASSWORD" -p 6379 ping 2>/dev/null | grep -qx PONG'     && podman exec netbox-valkey-cache sh -c        'valkey-cli --pass "$VALKEY_PASSWORD" -p 6380 ping 2>/dev/null | grep -qx PONG'; then
    dependencies_ready=1
    break
  fi
  sleep 2
done

[[ "${dependencies_ready}" -eq 1 ]] || {
  echo "[ERROR] PostgreSQL or Valkey did not become ready" >&2
  exit 1
}

if ! podman container exists netbox; then
  podman run -d --name netbox --pod netbox-pod     --user netbox:root     --env-file "${NETBOX_ENV}"     -v netbox-media-files:/opt/netbox/netbox/media     -v netbox-reports-files:/opt/netbox/netbox/reports     -v netbox-scripts-files:/opt/netbox/netbox/scripts     "docker.io/netboxcommunity/netbox:${NETBOX_TAG}"
fi

netbox_ready=0
for attempt in $(seq 1 120); do
  if podman exec netbox curl -fsS http://127.0.0.1:8080/login/ >/dev/null 2>&1; then
    netbox_ready=1
    break
  fi
  sleep 2
done

[[ "${netbox_ready}" -eq 1 ]] || {
  echo "[ERROR] NetBox did not become ready" >&2
  podman logs --tail 100 netbox >&2
  exit 1
}

if ! podman container exists netbox-worker; then
  podman run -d --name netbox-worker --pod netbox-pod     --user netbox:root     --env-file "${NETBOX_ENV}"     -e SKIP_SUPERUSER=true     -v netbox-media-files:/opt/netbox/netbox/media     -v netbox-reports-files:/opt/netbox/netbox/reports     -v netbox-scripts-files:/opt/netbox/netbox/scripts     "docker.io/netboxcommunity/netbox:${NETBOX_TAG}"     /opt/netbox/venv/bin/python /opt/netbox/netbox/manage.py rqworker
fi

podman pod ps
podman ps --pod
echo "NetBox: http://<server-ip>:8000"
SCRIPT

chmod 700 "${BUNDLE_ROOT}/scripts/run-netbox-pod.sh"
6. Create a Shutdown and Reset Script That Preserves Data
Deleting every container and volume whose name contains postgres or redis, as the earlier version of this article did, can destroy data belonging to other services on the server. This script targets exact NetBox resource names and preserves data volumes by default.
cat > "${BUNDLE_ROOT}/scripts/reset-netbox-pod.sh" << 'SCRIPT'
#!/usr/bin/env bash
set -euo pipefail

mode="${1:-keep-data}"

podman pod rm -f netbox-pod 2>/dev/null || true
podman rm -f netbox netbox-worker netbox-postgres   netbox-valkey netbox-valkey-cache 2>/dev/null || true

if [[ "${mode}" == "--delete-data" ]]; then
  read -r -p '데이터를 완전히 삭제하려면 DELETE-NETBOX-DATA 입력: ' answer
  [[ "${answer}" == "DELETE-NETBOX-DATA" ]] || {
    echo "취소했습니다."
    exit 1
  }

  for volume in netbox-postgres netbox-valkey-data netbox-valkey-cache-data                 netbox-media-files netbox-reports-files netbox-scripts-files; do
    podman volume rm -f "${volume}" 2>/dev/null || true
  done
else
  echo "컨테이너만 제거했습니다. 데이터 볼륨은 보존됩니다."
fi
SCRIPT

chmod 700 "${BUNDLE_ROOT}/scripts/reset-netbox-pod.sh"
7. Create the SHA-256 Manifest and Archive
chmod 600 "${BUNDLE_ROOT}"/env/*

(
  cd "${BUNDLE_ROOT}"
  find rpms images env scripts manifests -type f -print0     | sort -z     | xargs -0 sha256sum > SHA256SUMS
)

cd /opt
sudo tar --xattrs --selinux -czf "${BUNDLE_ID}.tar.gz" "${BUNDLE_ID}"
sudo sha256sum "${BUNDLE_ID}.tar.gz" > "${BUNDLE_ID}.tar.gz.sha256"
Offline NetBox Installation
1. Verify the Archive and Its Contents
Check the external SHA-256 checksum before extracting the archive, then verify the manifest inside the extracted bundle. If any check fails, stop the installation and inspect the transfer media and original bundle.
cd /opt
sudo sha256sum -c netbox-airgap-v4.6.5-5.0.2-rocky8-x86_64.tar.gz.sha256
sudo tar --xattrs --selinux -xzf netbox-airgap-v4.6.5-5.0.2-rocky8-x86_64.tar.gz

cd /opt/netbox-airgap-v4.6.5-5.0.2-rocky8-x86_64
sudo sha256sum -c SHA256SUMS
sudo chown -R root:root .
sudo chmod 600 env/*
2. Install Podman Without External Repositories
cd /opt/netbox-airgap-v4.6.5-5.0.2-rocky8-x86_64
sudo dnf install -y --disablerepo='*' ./rpms/*.rpm
sudo podman --version
If dependency errors occur, do not add arbitrary RPMs to the offline server. Verify that the online preparation server matches the target OS, architecture, and enabled repositories, then rebuild the bundle.
3. Load OCI Images and Verify Tags
cd /opt/netbox-airgap-v4.6.5-5.0.2-rocky8-x86_64

sudo podman load -i images/netbox.tar
sudo podman load -i images/postgres.tar
sudo podman load -i images/valkey.tar

sudo podman images --digests   | grep -E 'netboxcommunity/netbox|postgres|valkey/valkey'
cat manifests/image-digests.txt
Do not start the application if the loaded images differ from the manifest. Images loaded rootlessly are not visible to sudo podman; load and run them under the same user context.
4. Restrict the Firewall and Start the Application
The example allows TCP port 8000 only from the management network 10.20.0.0/16. Replace it with your actual management subnet. Configuring the firewall before starting containers reduces the need to reapply container network rules.
sudo firewall-cmd --permanent --add-rich-rule='rule family="ipv4" source address="10.20.0.0/16" port protocol="tcp" port="8000" accept'
sudo firewall-cmd --reload

cd /opt/netbox-airgap-v4.6.5-5.0.2-rocky8-x86_64
sudo ./scripts/run-netbox-pod.sh
curl -fsS http://127.0.0.1:8000/login/ -o /dev/null
sudo podman pod ps
sudo podman ps --podOpen http://<offline-server-IP>:8000 in a browser. For long-term operation, avoid exposing port 8000 broadly and use an internal reverse proxy with TLS.
Configure Automatic Startup After Reboot
Until you switch to systemd below, the startup script creates new resources. If stopped containers with those names already exist, start them with sudo podman pod start netbox-pod. After switching to systemd, consistently use systemctl to start and stop services. Before running the reset script, stop the managing service with sudo systemctl stop pod-netbox-pod.service.
The Podman version in Rocky Linux 8.10 repositories supports generated systemd units. Output from --new is generated on a best-effort basis, so review each file before installing it. This command is deprecated in Podman 5; prefer Quadlet when designing a new platform.
unit_dir="$(mktemp -d)"
cd "${unit_dir}"
sudo podman generate systemd --new --files --name netbox-pod

sudo install -m 0644 ./*.service /etc/systemd/system/
sudo restorecon -Rv /etc/systemd/system

sudo podman pod rm -f netbox-pod
sudo systemctl daemon-reload
sudo systemctl enable --now pod-netbox-pod.service
sudo systemctl status pod-netbox-pod.service --no-pager
Security Checks for Air-Gapped NetBox
- Avoid
ALLOWED_HOSTS=*; specify only the actual FQDNs, IP addresses, andlocalhost. - Generate random passwords instead of using example defaults, and restrict environment and backup files to mode
600. - Change the administrator password after the first login and remove the initial superuser password from the environment file.
- Restrict port 8000 to the management network, and use an internal TLS proxy where possible.
- Record image digests and the complete bundle’s SHA-256 checksum alongside the image tags in the approval record.
- Ensure the reset script deletes only exact NetBox resource names and never automatically runs a global
prune.
Validate Service State and Troubleshoot Failures
Inspect Basic Status and Logs
sudo podman pod ps
sudo podman ps -a --pod

sudo podman logs --tail 100 netbox
sudo podman logs --tail 100 netbox-worker
sudo podman logs --tail 100 netbox-postgres
sudo podman logs --tail 100 netbox-valkey
sudo podman logs --tail 100 netbox-valkey-cache

sudo podman exec netbox   /opt/netbox/venv/bin/python /opt/netbox/netbox/manage.py version
If logs fill the root filesystem, do not start deleting containers indiscriminately. Follow the No space left on device diagnostic procedure to distinguish exhausted blocks, exhausted inodes, and deleted files that are still open.
Common Errors and Causes
| Symptom | Check first | Remedy |
|---|---|---|
| NetBox exits after waiting for the database | PostgreSQL logs and DB_* settings |
Verify 127.0.0.1:5432 within the same pod |
| 400 Bad Request | ALLOWED_HOSTS |
Add the actual access FQDNs and IPs, separated by spaces |
| Initial admin login fails | SUPERUSER_NAME |
Check the variable name and first-start logs |
| Images are missing when using sudo | Mixed rootless and rootful contexts | Reload with sudo podman load |
| Access fails after a firewall reload | Podman network rules | Run sudo podman network reload --all |
| Local RPM dependency errors | OS, architecture, and repositories | Rebuild the bundle under matching conditions with --alldeps |
sudo podman exec netbox-postgres sh -c   'pg_isready -d "$POSTGRES_DB" -U "$POSTGRES_USER"'

sudo podman exec netbox-valkey sh -c   'valkey-cli --pass "$VALKEY_PASSWORD" -p 6379 ping'

sudo podman network reload --all
NetBox performs migrations during container startup. Run manage.py migrate manually only as a last resort, after verifying a database backup and image-version compatibility.
Backup and Restore
Back up a PostgreSQL dump and the media volume together before upgrades or redeployments. Redis and Valkey hold task queues and caches; PostgreSQL and media contain the primary source data. Also preserve the scripts and reports volumes according to your organization’s recovery objectives.
# Back up the database and media together during a maintenance window with application writes stopped.
sudo bash -euo pipefail <<'BASH'
backup_dir="/var/backups/netbox/$(date +%F-%H%M%S)"
install -d -m 0700 "$backup_dir"
umask 077
podman exec netbox-postgres pg_dump -U netbox -d netbox -Fc > "$backup_dir/netbox.dump"
test -s "$backup_dir/netbox.dump"
podman exec -i netbox-postgres pg_restore --list < "$backup_dir/netbox.dump" > "$backup_dir/dump-contents.txt"
podman volume export --output "$backup_dir/netbox-media-files.tar" netbox-media-files
(cd "$backup_dir" && sha256sum netbox.dump netbox-media-files.tar dump-contents.txt > SHA256SUMS && sha256sum -c SHA256SUMS)
BASH
Creating backup files is not enough. Regularly test PostgreSQL restoration and access to attachments on a separate test server.
Frequently Asked Questions
Why use a pod for air-gapped NetBox?
Containers in a pod share a network namespace, so they can reach the database and Valkey at 127.0.0.1, with externally published ports managed in one place. If stronger resource separation or independent scaling matters more, consider separate pods or an orchestrator.
What should the RPM preparation server match?
The safest setup matches the target’s Rocky Linux 8.10 version, CPU architecture, and enabled repositories. Use --alldeps to include dependencies already installed on the preparation server.
Can I use the latest tag?
This is not recommended. The same tag can move to a different image, making an approved bundle difficult to reproduce. Record both exact version tags and digests, and validate each upgrade as a separate new bundle.
Conclusion
A safe air-gapped NetBox deployment depends on more than copying files. Pin versions, match RPM repository conditions, verify image digests and SHA-256 checksums, protect secrets, precisely scope deletion, and test backup restoration. Following these steps makes a Podman-based NetBox deployment reproducible even on a Rocky Linux server without internet access.