Kea DDNS with BIND 9: TSIG and Automatic Forward and Reverse DNS Updates
EdwardMoon
Kea DDNS automatically registers a hostname’s A record and an address’s PTR record in BIND 9 when DHCP issues a lease. Kea DHCPv4 does not edit DNS zone files directly: it sends a Name Change Request to Kea D2, which signs an RFC 2136 dynamic update with TSIG and sends it to the BIND 9 primary.
This guide uses the 10.20.30.0/24 network and the internal domain lab.example.internal. Copying an ISC DHCP ddns-update-style example into Kea will not work. Align the component roles, key protection, forward and reverse zones, DHCID conflict handling, and service startup order. Commands and configuration are separated into code blocks.
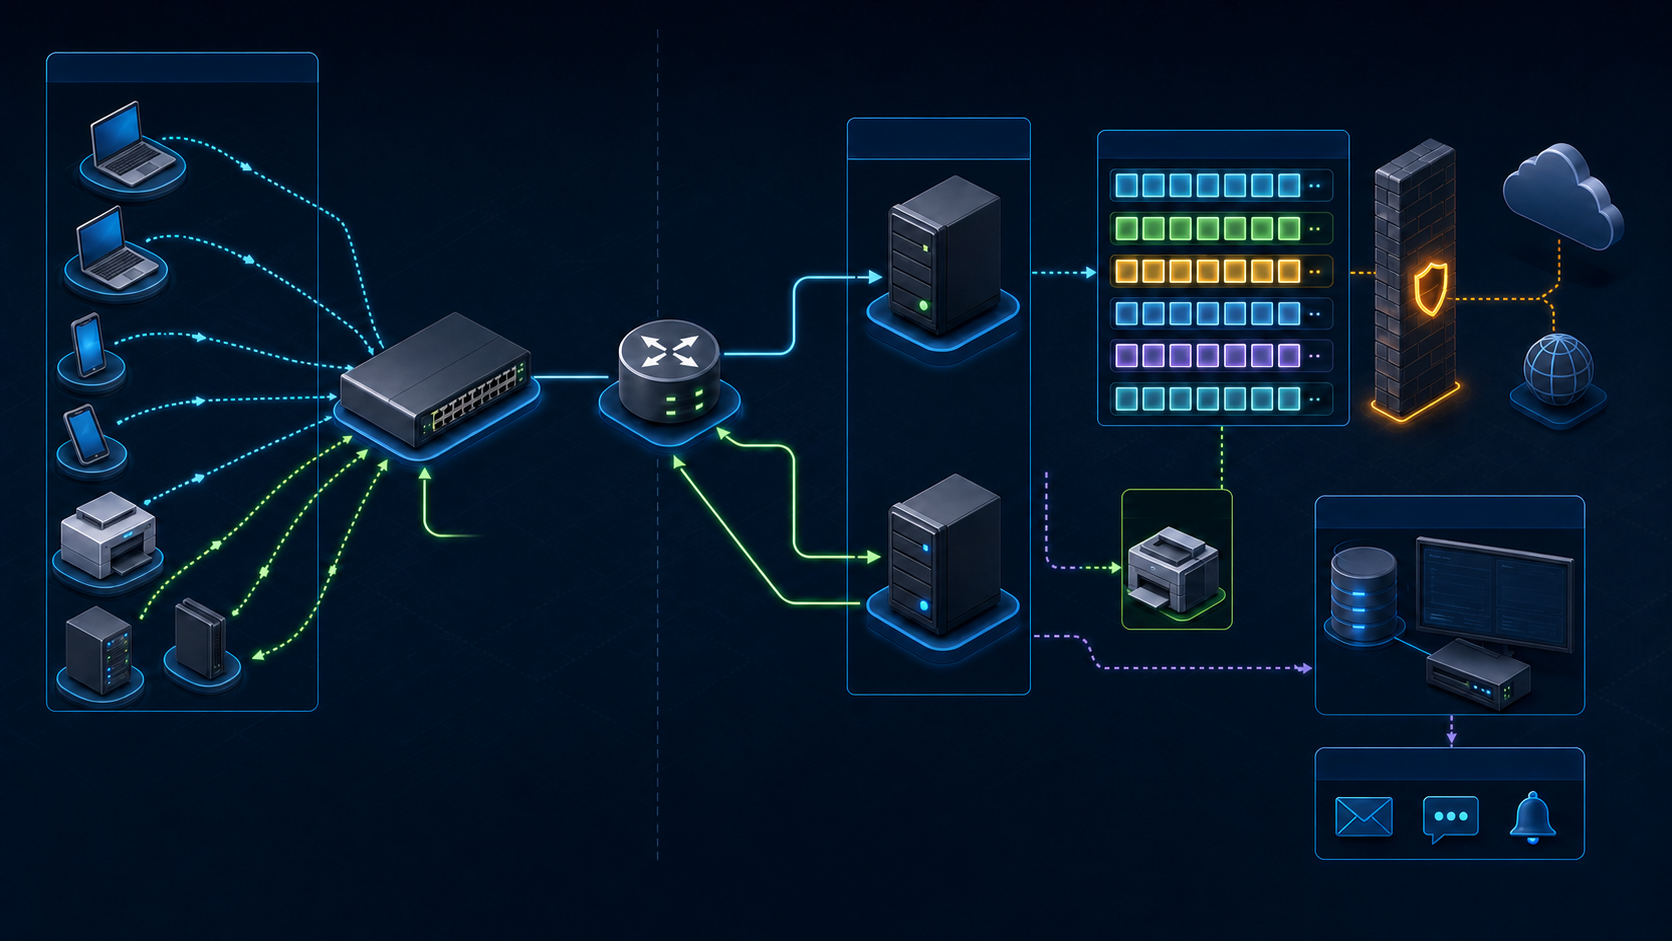
Components and Data Flow
This lab installs Kea DHCPv4, D2, and BIND together on one Rocky Linux 9 server at 10.20.30.53. Run key generation, local nsupdate tests, and service commands on this server; only client validation runs on a separate test device. If DHCP and DNS are separated in production, deploy the TSIG secret to the D2 host through a protected management channel, and adjust D2’s DNS target address and firewall rules.
| Component | Example address | Role |
|---|---|---|
| Kea DHCPv4 | 10.20.30.53 | Manages address leases and hostname policy; sends NCRs to D2 |
| Kea D2 | 127.0.0.1:53001 | Converts NCRs into DNS UPDATE messages and signs them with TSIG |
| BIND 9 primary | 10.20.30.53:53 | Authoritative server for forward and reverse dynamic zones |
| Client | 10.20.30.100~200 | Supplies a name or FQDN in DHCPREQUEST |
- The forward zone lab.example.internal. contains A records mapping hostnames to IPv4 addresses.
- The reverse zone 30.20.10.in-addr.arpa. contains PTR records mapping IPv4 addresses to FQDNs.
- DHCID records help prevent one DHCP client from overwriting a name owned by another.
- TSIG authenticates update messages and protects their integrity; it does not encrypt DNS query responses.
Consult the official Kea DHCP-DDNS Server, Kea DHCPv4 DDNS settings, and BIND 9 dynamic update policy documentation together.
Step 1: Preflight Checks and Packages
Install Kea and BIND 9 from supported distribution packages or an approved ISC repository. Check candidate versions and signatures before adding repositories. The following package names are examples for EL9 systems.
# First configure the same ISC 3.0 LTS repository used in the Kea DHCP guide.
curl --fail --location --proto '=https' --tlsv1.2 \
  https://dl.cloudsmith.io/public/isc/kea-3-0/setup.rpm.sh \
  --output /tmp/isc-kea-3-0-setup.rpm.sh
less /tmp/isc-kea-3-0-setup.rpm.sh
sudo bash /tmp/isc-kea-3-0-setup.rpm.sh

sudo dnf --showduplicates list isc-kea-dhcp4 isc-kea-dhcp-ddns bind bind-utils
sudo dnf install -y isc-kea-dhcp4 isc-kea-dhcp-ddns bind bind-utils policycoreutils-python-utils
rpm -q isc-kea-dhcp4 isc-kea-dhcp-ddns bind bind-utils
kea-dhcp4 -V
named -V
systemctl show kea-dhcp-ddns -p User -p Group -p ExecStart
First check the hostname, time synchronization, interfaces, and conflicts with existing DHCP or DNS listeners.
hostnamectl
chronyc tracking
ip -br address
sudo ss -luntp | grep -E ':(53|67|53001)\b' || true
getent passwd named
systemctl show kea-dhcp-ddns -p User -p Group
Step 2: Generate and Protect the TSIG Secret
BIND 9 and Kea D2 must use the same TSIG secret. Generate it as root without printing it to the screen or shell history, then place the BIND key block and Kea secret file under their respective minimum permissions. Match the key name exactly on both sides, including its trailing dot.
sudo install -d -o root -g named -m 0750 /etc/named/keys
sudo sh -c 'umask 077; tsig-keygen -a hmac-sha256 kea-ddns.lab.example.internal. > /etc/named/keys/kea-ddns.key'
sudo chown root:named /etc/named/keys/kea-ddns.key
sudo chmod 0640 /etc/named/keys/kea-ddns.key
Kea 2.5.8 and later support secret-file, so the secret need not be embedded directly in the configuration.
# Check the account and group running D2. An empty systemd User setting means root.
D2_USER=$(systemctl show kea-dhcp-ddns -p User --value)
D2_USER=${D2_USER:-root}
D2_GROUP=$(systemctl show kea-dhcp-ddns -p Group --value)
D2_GROUP=${D2_GROUP:-$(id -gn "$D2_USER")}
sudo install -d -o root -g "$D2_GROUP" -m 0750 /etc/kea/secrets
sudo install -o root -g "$D2_GROUP" -m 0640 /dev/null /etc/kea/secrets/kea-ddns.secret
sudo awk -F'"' '/secret/{print $2}' /etc/named/keys/kea-ddns.key \
  | sudo tee /etc/kea/secrets/kea-ddns.secret >/dev/null
sudo restorecon -Rv /etc/kea/secrets
sudo stat -c '%U:%G %a %n' /etc/named/keys/kea-ddns.key /etc/kea/secrets/kea-ddns.secret
Never copy TSIG secrets into posts, tickets, Git repositories, or command output. If compromise is suspected, generate a new key, replace it in BIND and D2 in a planned sequence, then revoke the old key.
Step 3: Configure BIND 9 Dynamic Zones
Include the TSIG key file in /etc/named.conf and define the forward and reverse primary zones.
include "/etc/named/keys/kea-ddns.key";

zone "lab.example.internal" IN {
    type primary;
    file "dynamic/db.lab.example.internal";
    allow-update { key "kea-ddns.lab.example.internal."; };
};

zone "30.20.10.in-addr.arpa" IN {
    type primary;
    file "dynamic/db.10.20.30";
    allow-update { key "kea-ddns.lab.example.internal."; };
};
allow-update grants that key update access to the entire zone. For finer restrictions on names or record types, design a BIND update-policy. Do not use both options in the same zone.
Modify the following entries inside the existing options block in /etc/named.conf; do not add a duplicate block. This server also provides recursive DNS to internal clients, so restrict query and recursion access to the lab network.
listen-on port 53 { 127.0.0.1; 10.20.30.53; };
listen-on-v6 port 53 { ::1; };
allow-query { localhost; 10.20.30.0/24; };
recursion yes;
allow-recursion { localhost; 10.20.30.0/24; };
Save the two zone files below as db.lab.example.internal and db.10.20.30 in the current directory, then deploy them with the following install commands.
Initial Forward Zone File
$TTL 300
@   IN SOA dns01.lab.example.internal. hostmaster.lab.example.internal. (
        2026072101  ; serial
        3600        ; refresh
        900         ; retry
        604800      ; expire
        300 )       ; minimum
    IN NS  dns01.lab.example.internal.
dns01 IN A 10.20.30.53
Initial Reverse Zone File
$TTL 300
@   IN SOA dns01.lab.example.internal. hostmaster.lab.example.internal. (
        2026072101  ; serial
        3600        ; refresh
        900         ; retry
        604800      ; expire
        300 )       ; minimum
    IN NS  dns01.lab.example.internal.
53  IN PTR dns01.lab.example.internal.
sudo install -d -o named -g named -m 0770 /var/named/dynamic
sudo install -o named -g named -m 0660 db.lab.example.internal /var/named/dynamic/
sudo install -o named -g named -m 0660 db.10.20.30 /var/named/dynamic/
sudo restorecon -Rv /etc/named/keys /var/named/dynamic
sudo named-checkconf /etc/named.conf
sudo named-checkzone lab.example.internal /var/named/dynamic/db.lab.example.internal
sudo named-checkzone 30.20.10.in-addr.arpa /var/named/dynamic/db.10.20.30named creates journal files for dynamic zones. Keep the package’s default SELinux contexts and make only the dynamic directory writable. Do not disable SELinux or set all of /var/named to mode 0777.
sudo systemctl enable --now named
sudo systemctl --no-pager --full status named
sudo journalctl -u named -b --no-pager | tail -n 100
dig @127.0.0.1 SOA lab.example.internal +norecurse
dig @127.0.0.1 SOA 30.20.10.in-addr.arpa +norecurse
Step 4: Test BIND Dynamic Updates Independently
Testing BIND and TSIG with nsupdate before connecting Kea isolates failures to a smaller part of the system. This test creates temporary A and PTR records, verifies them, and removes them.
sudo nsupdate -k /etc/named/keys/kea-ddns.key <<'EOF'
server 127.0.0.1
zone lab.example.internal.
update add ddns-test.lab.example.internal. 300 A 10.20.30.250
send
zone 30.20.10.in-addr.arpa.
update add 250.30.20.10.in-addr.arpa. 300 PTR ddns-test.lab.example.internal.
send
EOF
dig @127.0.0.1 ddns-test.lab.example.internal A +short
dig @127.0.0.1 -x 10.20.30.250 +short
sudo journalctl -u named --since '-5 minutes' --no-pagersudo nsupdate -k /etc/named/keys/kea-ddns.key <<'EOF'
server 127.0.0.1
update delete ddns-test.lab.example.internal. A
send
update delete 250.30.20.10.in-addr.arpa. PTR
send
EOFStep 5: Configure Kea D2
Configure /etc/kea/kea-dhcp-ddns.conf as follows. The DNS server address must point to the BIND 9 primary.
{
  "DhcpDdns": {
    "ip-address": "127.0.0.1",
    "port": 53001,
    "dns-server-timeout": 1000,
    "ncr-protocol": "UDP",
    "ncr-format": "JSON",
    "tsig-keys": [
      {
        "name": "kea-ddns.lab.example.internal.",
        "algorithm": "HMAC-SHA256",
        "secret-file": "/etc/kea/secrets/kea-ddns.secret"
      }
    ],
    "forward-ddns": {
      "ddns-domains": [
        {
          "name": "lab.example.internal.",
          "key-name": "kea-ddns.lab.example.internal.",
          "dns-servers": [ { "ip-address": "10.20.30.53", "port": 53 } ]
        }
      ]
    },
    "reverse-ddns": {
      "ddns-domains": [
        {
          "name": "30.20.10.in-addr.arpa.",
          "key-name": "kea-ddns.lab.example.internal.",
          "dns-servers": [ { "ip-address": "10.20.30.53", "port": 53 } ]
        }
      ]
    },
    "loggers": [
      { "name": "kea-dhcp-ddns", "severity": "INFO" }
    ]
  }
}
sudo kea-dhcp-ddns -t /etc/kea/kea-dhcp-ddns.conf
sudo systemctl enable --now kea-dhcp-ddns
sudo systemctl --no-pager --full status kea-dhcp-ddns
sudo ss -lunp | grep ':53001'
sudo journalctl -u kea-dhcp-ddns -b --no-pager | tail -n 100Step 6: Connect DHCPv4 to D2
The example uses ddns-override-client-update: true so Kea manages both A and PTR records when a client requests updates. It respects a client’s request for no updates with ddns-override-no-update: false. Consequently, not every device will automatically receive A/PTR records; inspect the FQDN option and actual NCR logs together.
The following example shows the key parts of /etc/kea/kea-dhcp4.conf. Adapt the interface, router, DNS address, and pool to the actual network. Both dhcp-ddns.enable-updates and ddns-send-updates must be enabled for requests to reach D2.
{
  "Dhcp4": {
    "interfaces-config": { "interfaces": [ "ens192" ] },
    "lease-database": {
      "type": "memfile",
      "persist": true,
      "name": "/var/lib/kea/kea-leases4.csv"
    },
    "renew-timer": 900,
    "rebind-timer": 1800,
    "valid-lifetime": 3600,
    "dhcp-ddns": {
      "enable-updates": true,
      "server-ip": "127.0.0.1",
      "server-port": 53001,
      "ncr-protocol": "UDP",
      "ncr-format": "JSON"
    },
    "ddns-send-updates": true,
    "ddns-override-no-update": false,
    "ddns-override-client-update": true,
    "ddns-replace-client-name": "when-not-present",
    "ddns-generated-prefix": "host",
    "ddns-qualifying-suffix": "lab.example.internal",
    "ddns-update-on-renew": false,
    "ddns-conflict-resolution-mode": "check-with-dhcid",
    "subnet4": [
      {
        "id": 100,
        "subnet": "10.20.30.0/24",
        "pools": [ { "pool": "10.20.30.100 - 10.20.30.200" } ],
        "option-data": [
          { "name": "routers", "data": "10.20.30.1" },
          { "name": "domain-name-servers", "data": "10.20.30.53" },
          { "name": "domain-name", "data": "lab.example.internal" }
        ]
      }
    ],
    "loggers": [ { "name": "kea-dhcp4", "severity": "INFO" } ]
  }
}
ddns-replace-client-name is configured to generate a name only when one is missing. If policy requires the server to assign every name, consider always, but first design reservations and naming rules that do not conflict with existing client names.
sudo kea-dhcp4 -t /etc/kea/kea-dhcp4.conf
sudo systemctl enable --now kea-dhcp4
sudo systemctl --no-pager --full status kea-dhcp4
sudo ss -lunp | grep -E ':(67|53001)\b'
sudo journalctl -u kea-dhcp4 -b --no-pager | tail -n 100
Step 7: Validate Actual A, PTR, and DHCID Records
Obtain a new DHCP lease on a test client, then query both forward and reverse DNS using its actual assigned address and FQDN. Renewing a production interface’s lease can disconnect it, so use a console or a separate test device.
# Renew the lease on the test client using the method appropriate to its environment
sudo dhclient -r ens192
sudo dhclient -v ens192
ip -4 address show dev ens192
dig @10.20.30.53 client01.lab.example.internal A +noall +answer
dig @10.20.30.53 -x 10.20.30.101 +noall +answer
dig @10.20.30.53 client01.lab.example.internal DHCID +noall +answer
sudo journalctl -u kea-dhcp4 -u kea-dhcp-ddns -u named \
--since '-10 minutes' --no-pager| Symptom | Check first | Typical cause |
|---|---|---|
| Neither A nor PTR exists | DHCPv4 logs and UDP 53001 | D2 connection disabled, hostname policy, or stopped D2 service |
| Only A is created | reverse-ddns domains and the reverse zone | Mismatched reverse zone name or DNS server address |
| NOTAUTH | BIND primary and zone declarations | Updates sent to a secondary or a mismatched zone name |
| NOTAUTH or REFUSED | TSIG key name, secret, and algorithm | Mismatched key or missing allow-update permission |
| YXDOMAIN or a conflict | Existing A/DHCID records and the client identifier | Another client owns the same name |
Operate Dynamic Zones Without Editing Live Files Directly
While named is running, a dynamic zone is managed together with its .jnl journal. Directly editing the zone file can cause changes to be overwritten or leave it inconsistent with the journal. If manual changes are necessary, synchronize the zone, freeze it, make and validate the change, then thaw it.
sudo rndc freeze lab.example.internal
sudoedit /var/named/dynamic/db.lab.example.internal
sudo named-checkzone lab.example.internal /var/named/dynamic/db.lab.example.internal
sudo rndc thaw lab.example.internal
sudo rndc zonestatus lab.example.internal
Do not delete .jnl files or A/PTR/DHCID records in bulk to make errors disappear. First inspect the DHCP lease owner and forward, reverse, and DHCID records together, then plan service shutdown, backup, and recovery.
Check Firewall Rules, SELinux, and Permissions
Clients need TCP and UDP port 53 to the authoritative DNS server, and DHCP communication needs its corresponding ports between server and clients. D2’s UDP 53001 listener is bound only to loopback on the same host, so do not expose it externally.
sudo firewall-cmd --get-active-zones
sudo firewall-cmd --permanent --zone=internal --add-service=dns
sudo firewall-cmd --permanent --zone=internal --add-service=dhcp
sudo firewall-cmd --reload
sudo firewall-cmd --zone=internal --list-all
sudo ss -luntp | grep -E ':(53|67|53001)\b'
sudo ausearch -m AVC -ts recent | tail -n 50
Disabling firewalld or SELinux is not a remedy. Allow named to write only to the dynamic directory, restrict D2’s secret file to root and its actual execution account, and grant TSIG permissions only on required zones.
High Availability, Backup, and Monitoring Checklist
- Use failover tests to confirm both Kea HA DHCP servers can reach D2 and authoritative DNS.
- Synchronize DNS secondaries through primary NOTIFY and IXFR/AXFR, and explicitly target the primary for D2 updates.
- Back up Kea configuration, lease databases, BIND configuration, zones and journals, and TSIG keys with appropriate security classifications.
- Restrict access to key restoration and regularly rehearse key rotation and service restart order.
- Monitor D2 queues, DNS UPDATE results, A/PTR mismatches, and zone serials, as well as DHCP lease success.
sudo systemctl is-active kea-dhcp4 kea-dhcp-ddns named
sudo kea-dhcp4 -t /etc/kea/kea-dhcp4.conf
sudo kea-dhcp-ddns -t /etc/kea/kea-dhcp-ddns.conf
sudo named-checkconf -z /etc/named.conf
sudo rndc status
sudo rndc zonestatus lab.example.internal
Related Articles
- Kea DHCP on Rocky Linux 9: Reservations, Validation, and HA
- Linux No space left on device Troubleshooting
Conclusion
A safe Kea DDNS deployment validates boundaries in stages: BIND zones, an independent TSIG test, the D2 connection, and then a real DHCP lease. Inspect forward A, reverse PTR, and DHCID records together. Include secret permissions, dynamic-zone journals, backups, and key rotation in operating procedures so automation preserves data consistency.