Preventing AWS Bill Shock: Checking Free Tier, Budget Alerts, and EC2 Charges
AI Editter
You turned off your EC2 instance for a lab, but costs continue to rise the next day. You chose the Free Tier, so you assumed it was free, yet the billing dashboard shows a charge. There is no need to turn the instance back on to investigate. The first place to check is the Billing details by service, region, and usage type.
Preventing AWS bill shock begins with verifying your account’s free benefits, setting up cost alerts, and cleaning up resources after your lab is finished. Simply clicking the stop button on an EC2 instance does not resolve all three. The following content is based on personal lab accounts and small-scale on-demand environments. The verification date for pricing and Free Tier policies is September 20, 2026.
What to do first if your costs are rising
- Open Bills under Billing and Cost Management. Expand the current month’s costs by service to record the charged regions and usage types.
- Find the resources in those regions. Even if you do not have servers in Seoul, lab resources might still be active in other regions.
- Eliminate the cause of charges for unused resources. Do not just stop the EC2 instance; check connected resources such as EBS, Elastic IPs, and NAT Gateways. Review data and service dependencies before deletion.
- Create cost alerts. While this does not erase charges already incurred, it helps prevent late discovery of issues in future labs.
You can learn how to read your billing dashboard in the AWS Billing documentation. Since previous usage may be reflected with a delay even after you take action, do not assume your cleanup failed just because the total increased temporarily.
AWS Free Tier: Conditions vary based on sign-up date
If you apply the ‘750 hours per month for EC2, 12 months free’ guidance found via search to an account created today, your calculations will be off. AWS changed the Free Tier for new customers to a credit-based system on July 15, 2025.
| Account Type | Conditions to Check | Commonly Overlooked Areas |
|---|---|---|
| Created before July 15, 2025 | Free limits per service and time elapsed since sign-up | The 12-month benefit does not renew annually. As of the verification date of this article, the 12-month period for such accounts has already expired. |
| Created on or after July 15, 2025, Free plan | Remaining credits and usage period of up to 6 months | The free plan ends when either the period expires or the credits are exhausted, whichever comes first. |
| Paid plan | Credit eligibility, balance, expiration date, and actual usage | Costs not covered by credits may be charged. |
New customers receive $100 in credits upon sign-up and can receive up to an additional $100 by completing specific activities. You do not automatically get $200 just by signing up. The Free plan does not incur charges unless you switch to a paid plan, but there are limitations on available services. If you wish to continue operations after the free plan ends, you must check the conversion conditions. AWS Free Tier FAQ
Check your plan, credit balance, and expiration date in the console first. Just because the 12-month benefit of an older account has ended does not mean the free usage limits for all services have disappeared. Since application conditions vary by service, it is more accurate not to combine new credits with existing free limits. EC2 Free Tier usage criteria
Setting up AWS Budgets alerts: Example for a $10/month lab budget
If you have decided to spend up to $10 per month on personal labs, set up an alert to receive an email before reaching that amount. The following amounts are for illustrative purposes. For services already in operation, you need a threshold based on your typical usage.
- Navigate to Billing and Cost Management → Budgets → Create budget.
- Select Customize (advanced) → Cost budget.
- Set the period to Monthly, the renewal to Recurring, the amount type to Fixed, and enter 10 USD for the budget.
- Initially, do not apply specific service or region filters; target the entire account cost. Narrowing the filters might cause you to miss charges incurred by other services.
- Set actual cost alerts at 10%, 50%, and 100%. In this example, these correspond to 1 USD, 5 USD, and 10 USD. Adding a 100% forecasted cost alert also helps in identifying potential overages by the end of the month.
- Enter an email address you check regularly and save. If you selected SNS, you must also configure subscription confirmation and delivery permissions.
You should also distinguish whether you want to view the projected bill after credits are applied or the resource usage cost before credits are deducted. To detect how much your practice resources are costing, check the credit inclusion settings in the budget’s advanced options. This setting ensures that an increase in usage is not masked by a sufficient credit balance. Creating a cost budget · Cost items to include in a budget
A 10 USD budget is not a payment cap. If you only set up alerts, resources will continue to run even after exceeding 10 USD. There is also a delay between usage aggregation and alerts. While you can configure separate Budgets Actions, you must specify targets and permissions, and it should not be viewed as a mechanism to stop all account charges in real time. AWS Budgets behavior and alert delays
Verifying input locations on the actual AWS screen
Below is an image from the official AWS hands-on guide with red boxes and numbers added to the console screen. The original material was updated on October 8, 2025, so current console layouts and wording may differ. The screen shows a 100 USD example from the simple template; please distinguish this from the 10 USD budget in the advanced settings explained above.
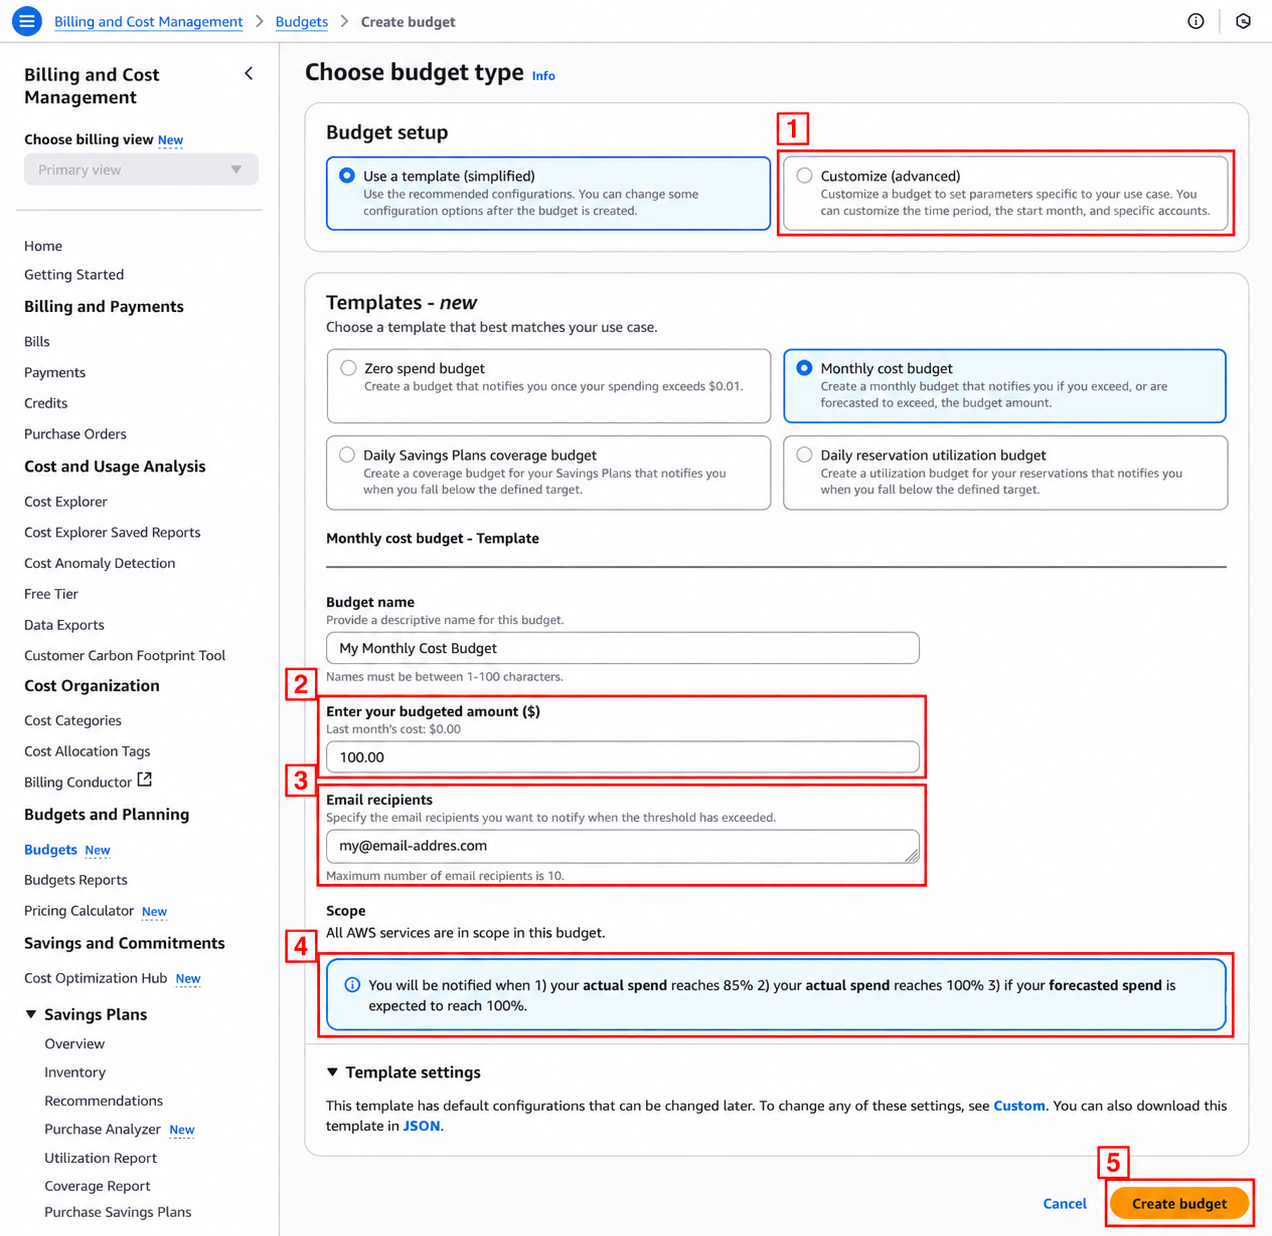

- ① Customize (advanced): Select this path to manually specify the 10%, 50%, and 100% alerts mentioned in the text. The screen layout changes after selection.
- ② Budget amount: If using the simple template, enter your monthly budget here. The practice standard for this article is 10.00 USD. Do not copy the 100.00 from the screen.
- ③ Email: Enter your own address to receive alerts instead of the example address.
- ④ Default alerts: This template suggests alerts for 85% and 100% of actual costs, and 100% of forecasted costs. These differ from the custom criteria suggested earlier.
- ⑤ Create budget: Create the budget after verifying the amount, recipient, and alert conditions.
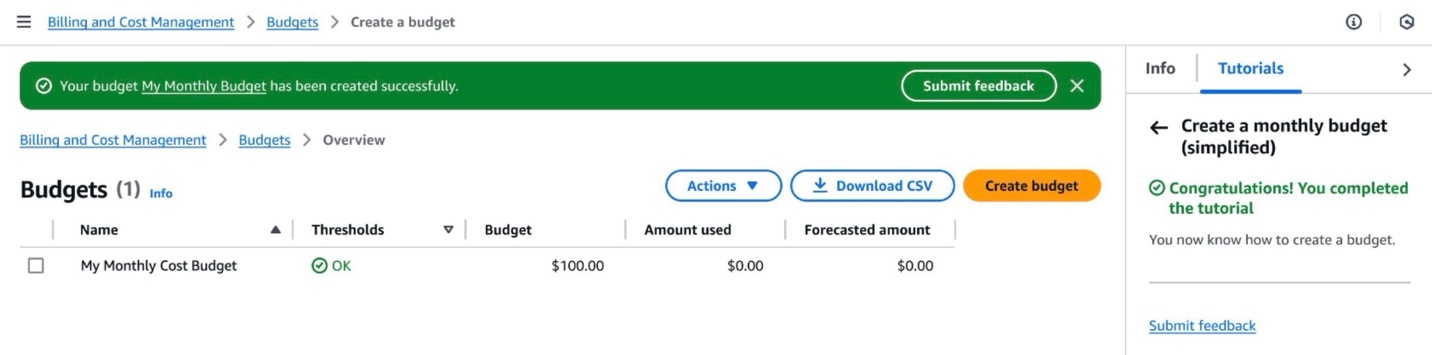
Completion of creation does not mean completion of billing prevention. Re-verify the recipient and alert conditions in the saved budget.
Why charges occur even after stopping EC2
A typical EBS-backed on-demand EC2 instance stops incurring instance usage fees when it enters the stopped state. However, disks and IP addresses are separate resources. The reason you can use your data as is when you restart the server is that the EBS volume is preserved. EC2 billing criteria by state
| Resource | When only EC2 is stopped | Check after finishing practice |
|---|---|---|
| EC2 instance | General on-demand usage fees stop | Distinguish between a temporary pause and an instance that is no longer needed |
| EBS volume | Storage charges continue | Check unattached volumes and ‘delete on termination’ settings |
| EBS snapshot | Storage costs remain separate | Retain only the points in time necessary for restoration and review unnecessary snapshots |
| Elastic IP | Maintaining billing for addresses allocated to the account | Ensure that unused addresses are not only disassociated but also released |
| NAT Gateway | Billed separately regardless of EC2 status | Review the necessity of deleting gateways after verifying route dependencies |
Do not assume that all EBS volumes are deleted when an instance is terminated. The DeleteOnTermination setting may vary for each volume. Snapshots also remain separately. If you plan to reuse the data, decide whether to accept the retention costs or keep only the necessary backups before cleaning up. Terminating instances and volume retention · EBS volume and snapshot pricing
Reserved Instance or Savings Plans commitment costs are separate. Stopping an instance does not eliminate the commitment. If you choose a long-term commitment based solely on the discount rate for a short practice session with undefined usage patterns, you may still incur costs even when not in use. Reserved Instance payment options
Checking EBS volumes: Finding disks of stopped servers
- Switch to the billed region and open EC2 → Elastic Block Store → Volumes. To find disks attached to an instance, select the server in Instances and click the volume ID displayed in the block devices under Storage.
- Check the state, size, type, and attached instance in the volume list.
in-usemeans it is in an attached state, and the volume remains even if the server is stopped.availablemeans it is not attached, but it does not mean it is free. - Check the name, tags, and owner of unattached volumes. Verify if the data is necessary or if there are recoverable backups before cleaning up. If you have configured additional IOPS or throughput, check those items as well.
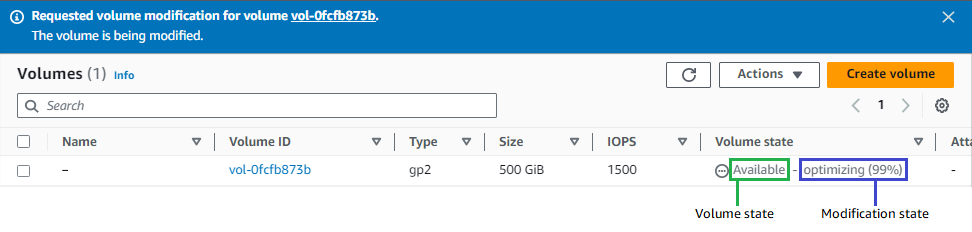
The meaning of each state and how to view them can be found in the EBS volume information documentation. Even if the list is empty in the current region, it does not mean that other regions have been cleaned up.
Checking EBS snapshots: Reviewing backups of deleted servers
- Open EC2 → Elastic Block Store → Snapshots and select Owned by me for the viewing scope.
- Select a snapshot to check the original volume ID, creation time, description, tags, and Storage tier. Snapshots may remain even if the original server or volume has been deleted.
- Check the retention policy and the recovery purpose of AMIs and backups. Completed indicates creation is finished, and Archive indicates the archive tier. Neither implies free storage.
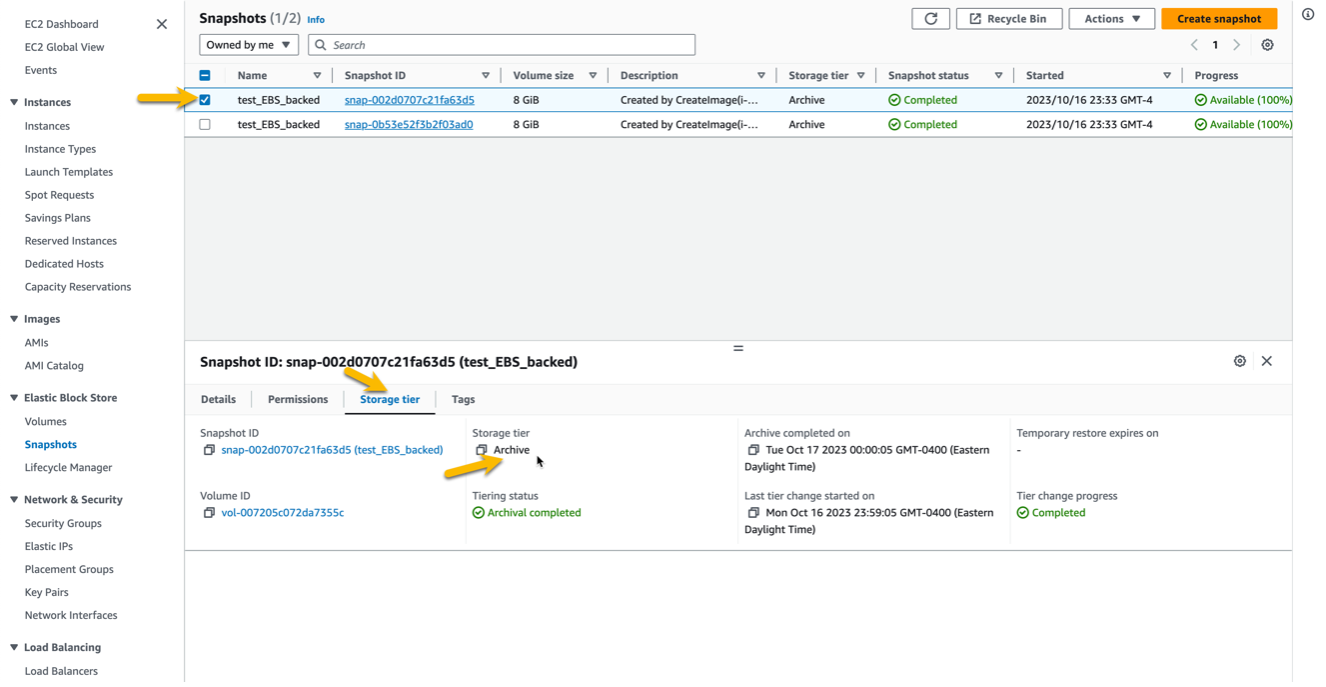
The Volume size in the list is the size of the volume to be restored. Do not calculate this directly as the snapshot billing capacity. The total snapshot size must also be distinguished from the actual billed amount based on incremental storage. Check the screen information in the snapshot lookup documentation and the actual costs in Bills respectively.
Public IPv4 and NAT Gateway costs are calculated separately
The base price for a public IPv4 address provided by AWS is $0.005 per hour per address. Assuming one is used for 30 full days, it is 0.005 × 24 × 30 = 3.60 USD. This amount is an example calculating only the IP address and does not include EC2, disk, traffic, or taxes. It is based on the rate before applying credits or free tier benefits. Since addresses in use are also subject to billing, old guidance stating that connecting an Elastic IP to a running server is free is no longer accurate by current standards. Amazon VPC Public IPv4 pricing
Auto-assigned public IPv4 addresses are returned when an EC2 instance is stopped, but Elastic IPs are retained. If you think of the two addresses as the same, it is difficult to find the reason why costs remain after cleanup. Resources retained/released when stopping EC2
NAT Gateways incur costs based on the time they are created and the data processed. The structure is not such that costs become zero just because you did not connect to the attached EC2. If you created NAT Gateways in multiple Availability Zones using the VPC creation wizard, check the number of gateways as well. Since the hourly unit price varies by region, do not apply example amounts from other regions to practice in the Seoul region. Amazon VPC NAT Gateway pricing
Whether a NAT Gateway is needed in a small practice environment is a matter to be decided at the network design stage. Avoid methods such as blindly changing databases to public or opening all inbound traffic to reduce costs.
Checking public IPv4: Tracking which service uses the address
- Open the VPC IPAM console → Public IP insights. ① in the image below is the menu. Check for unassociated Elastic IPs in the ② Unassociated Elastic IP addresses notification and ③ EIP usage.
- In the ④ Public IP addresses list, examine the service, network interface ID, instance ID, and connection status for each address. Even if the instance ID is empty, it may be an address used by a NAT Gateway or a load balancer. Associated means it is connected, not that traffic is occurring.
- To check only Elastic IPs directly, go to EC2 → Network & Security → Elastic IPs. Select an address to check the Allocation ID, Association ID, and the connected network interface/instance. For auto-assigned public IPs, select the instance in EC2 Instances and check the Public IPv4 address under Networking.
- For unnecessary Elastic IPs, verify their connection purpose and return them using Release Elastic IP addresses. If you only Disassociate, the address may remain in your account and be billed. Since there is no guarantee that you can get the same address back after releasing it, check first if it is used in DNS or external allowlists.
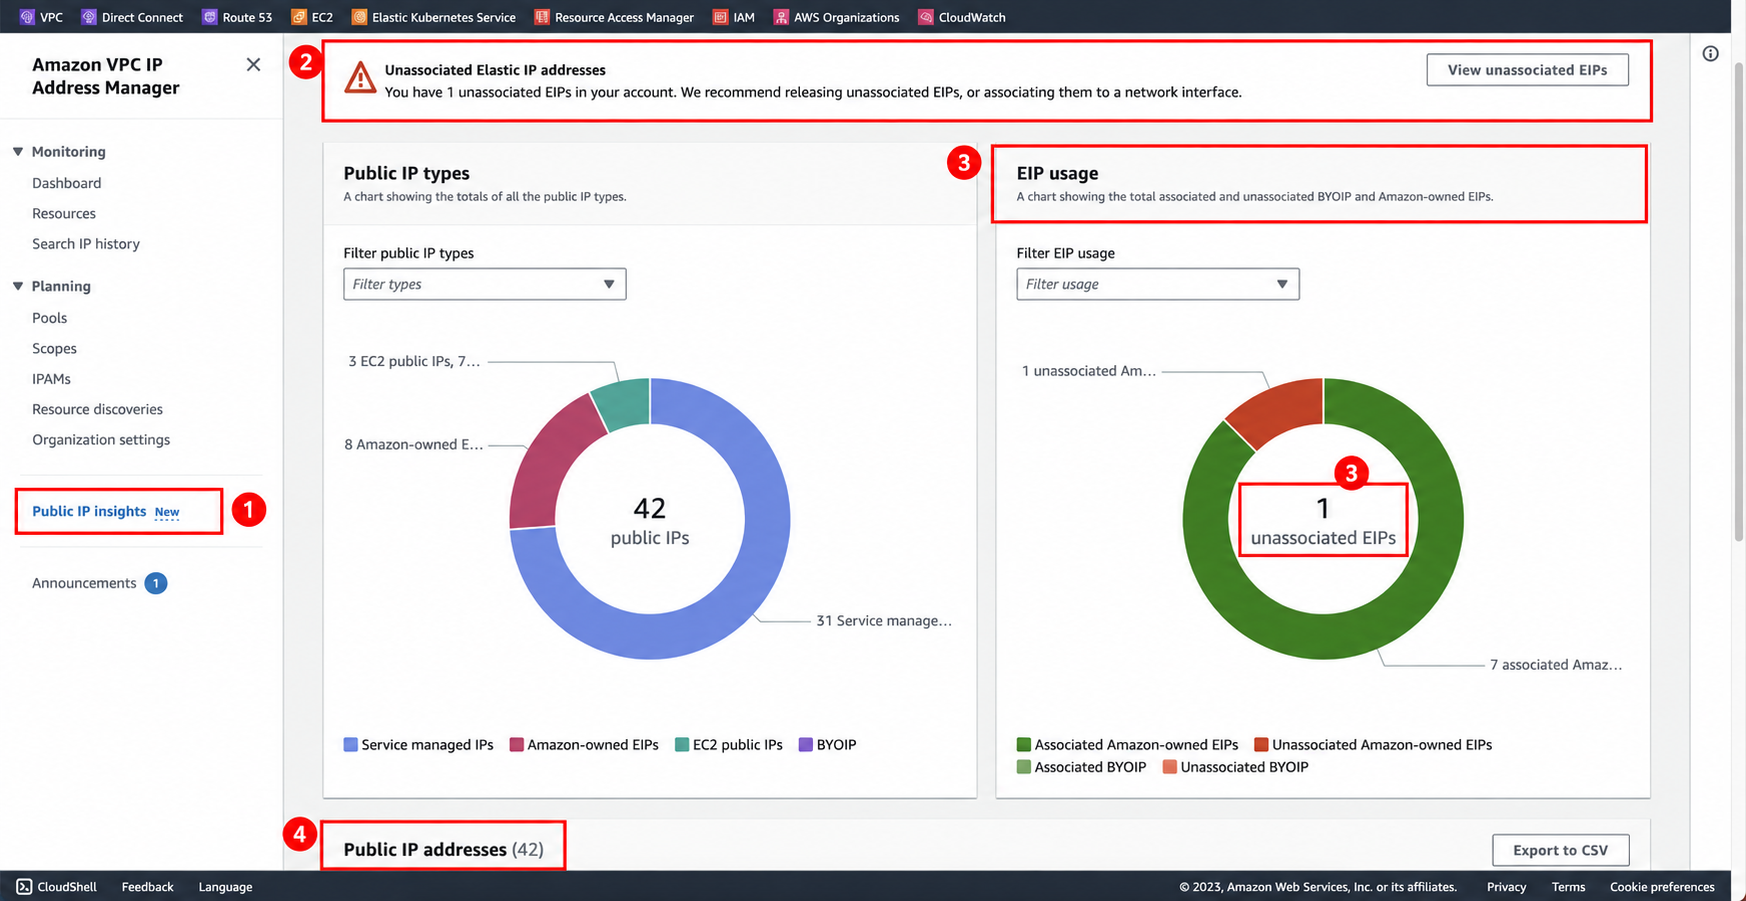
Public IP insights is affected by the account/region being explored, permissions, and data collection timing. If the list is empty, check the search scope and refresh timing, and cross-check in the EC2 console. For detailed scope, refer to the Public IP insights documentation, and for return procedures, refer to the Elastic IP release documentation.
NAT Gateway check: Verifying status, connected IP, traffic, and routing
- In the VPC console → NAT gateways, select the gateway in the region where the charges occurred. Record the NAT Gateway ID and VPC, and check ① Availability mode and Connectivity type, and ② State in the image below. The items displayed vary depending on whether it is Public or Private, and Zonal or Regional.
- For a public NAT, check the connected address and Allocation ID under the IP address information. ④ Associated IP addresses in the image corresponds to this area. Since there may be multiple addresses, do not stop after checking only the first one. Private NATs do not have Elastic IPs.
- Check the byte transfer volume and connection count in ③ Monitoring or CloudWatch. Verify recent usage history, including the times when scheduled tasks run. Even if traffic is 0, hourly charges may occur if the gateway exists, and ‘no data’ is not the same as 0 usage.
- In VPC → Route tables → Routes, check the routes targeting the
nat-…ID you recorded. For example, subnets with a0.0.0.0/0 → nat-…route can go out to the internet through that NAT. Also, check Subnet associations to identify the affected servers and tasks.
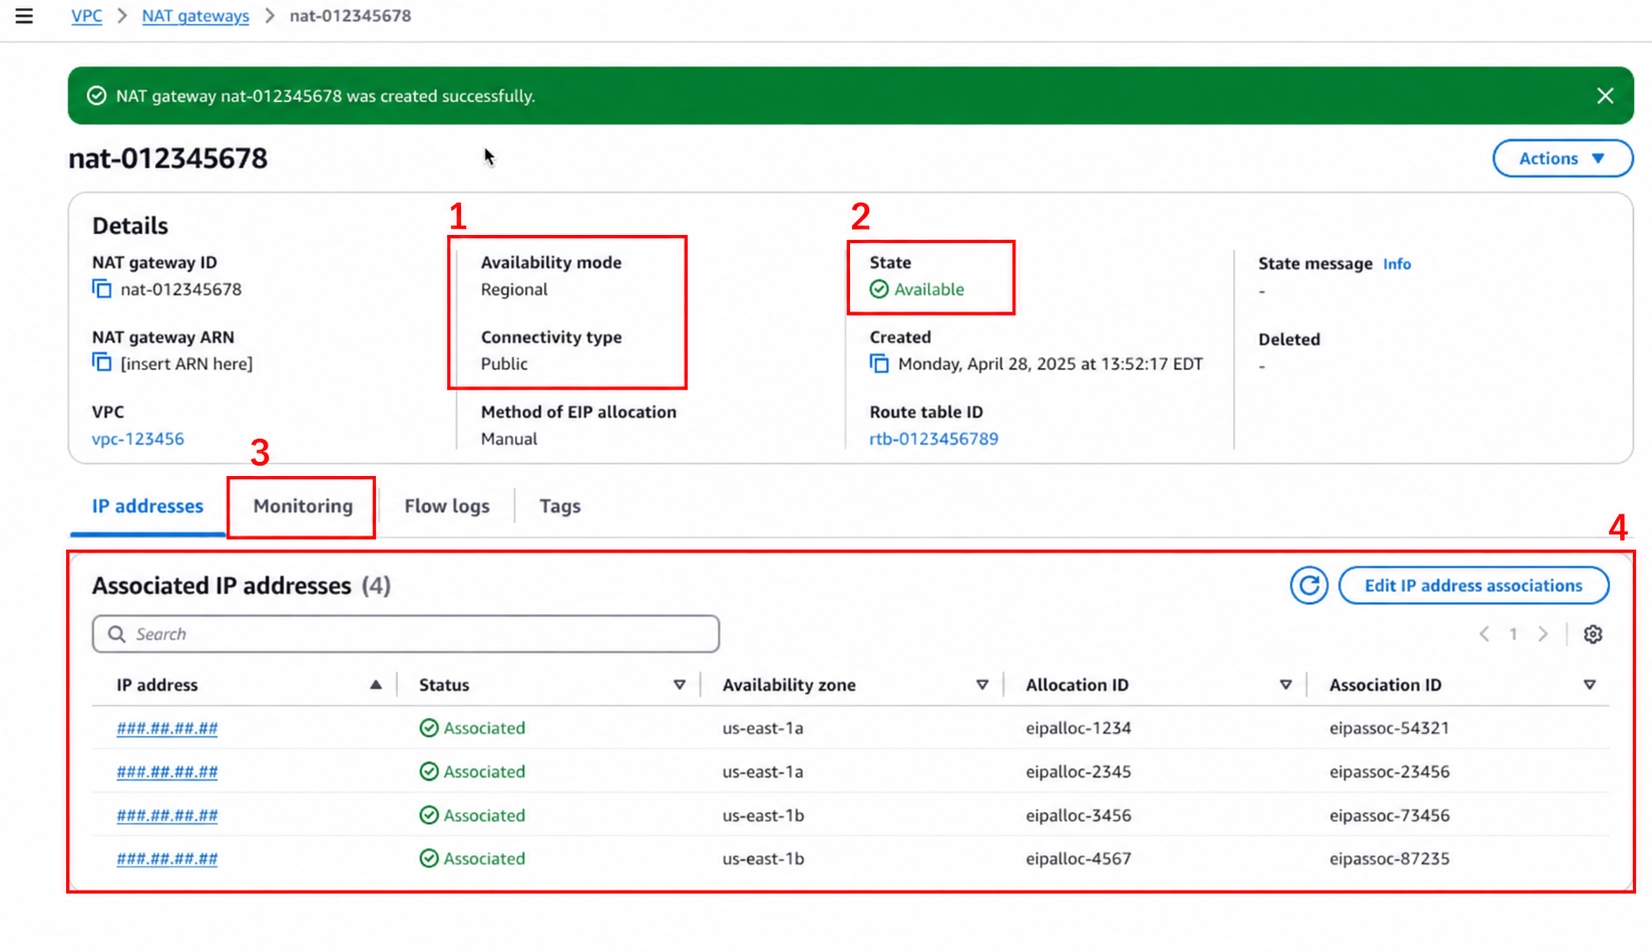
There is no way to stop a NAT Gateway like an EC2 instance. If you confirm it is unnecessary, consider deleting it, but first, you must clean up the communication paths of the subnets that use it. Deleting the NAT does not automatically remove related routing, and Elastic IPs that were manually allocated may need to be released separately. Check the conditions in the NAT Gateway management and deletion behavior documentation.
Finally, re-check the usage types containing PublicIPv4 or NatGateway and the region in Bills. The console list is used to find remaining resources, while billing details are used to identify which items incurred costs. If you see costs for Load Balancers, RDS, or VPC Endpoints, check for remaining resources in EC2 Load Balancers, RDS Databases, and VPC Endpoints, respectively.
If you have finished the practice, clean up in this order.
Before clicking the delete button, write down the resource name, ID, region, and connected services to reduce the risk of accidentally touching production resources with the same name. For environments created with Terraform or CloudFormation, start by checking the deletion plan of the deployment tool.
- Secure necessary data first. Prioritize checking data that cannot be recreated, such as DB dumps, uploaded files, and configuration files. Note that if you leave backups, the storage costs for them will also remain.
- Check configurations that regenerate. If you terminate EC2 instances managed by Auto Scaling or deployment tools only from the console, they may be recreated. First, check the desired instance count and the resource relationships of the stack.
- Check EC2, volumes, snapshots, and Elastic IPs for every region used. The fact that the instance list is empty does not mean the cleanup is finished.
- Check VPC and connected services. Review components outside the servers, such as NAT Gateways, load balancers, and paid VPC endpoints.
- Check RDS and stored data. Look at items that remain separately, such as DB instances, final snapshots, S3 stored data, and logs.
- Re-check billing details. Write down the time of cleanup and compare which usage types continue to increase in subsequent aggregations. You must look at the increase per resource rather than the cost total to narrow down the cause.
RDS should be viewed differently from EC2 here. RDS DB instances that support stopping can be stopped for a maximum of 7 consecutive days, after which they will automatically restart. Even while stopped, storage and applicable backup costs remain. Do not leave a practice account unattended under the assumption that ‘I turned off the DB, so next month will be fine.’ RDS stop conditions
If you plan to continue operating servers, also check Linux disk and inode usage diagnostics. Identifying which data has increased before handling disk shortage issues solely by expanding capacity can reduce unnecessary storage expansion.
Frequently Asked Questions about AWS Billing
If I am on the Free Tier but see an amount on the billing screen, will I be charged?
You cannot conclude based solely on the amount on the screen. You must distinguish between resource usage costs and the billed amount after credits are applied, and check whether you are on a Free plan or a Paid plan. You can determine the actual amount to be paid by looking at the free tier limits, credit eligibility, balance, and expiration dates together.
If I set the budget to $1, will I only be charged up to $1?
No. General Budgets notifications are a feature that alerts you when you have exceeded or are expected to exceed a specified cost threshold. It does not automatically block the execution of resources, and additional costs may occur during the aggregation delay.
I deleted the EC2 instance, but if the cost increases the next day, what should I check?
First, check if it is a delay in usage reflection. Next, check for remaining EBS volumes, snapshots, Elastic IPs, NAT Gateways, and resources in other regions. You must expand from the service name to the usage type in the bill to narrow down what to check.
Can I get a refund for unexpected charges?
You should not leave resources unattended on the assumption of a refund. First, clean up the cause of the charges, and then prepare the billing period, service, region, discovery time, and action taken to check with AWS Support’s account and billing inquiries. Whether an adjustment is made is subject to individual review. AWS Support inquiry types and submission methods
Before starting the next practice, you only need to check three things: the expiration conditions of your plan and credits, the recipient of cost notifications, and the list of resources to delete after the practice. If you bundle server creation and cleanup into one task, you will also reduce the possibility of discovering forgotten resources in your bill a few days later.